%20(1).png)

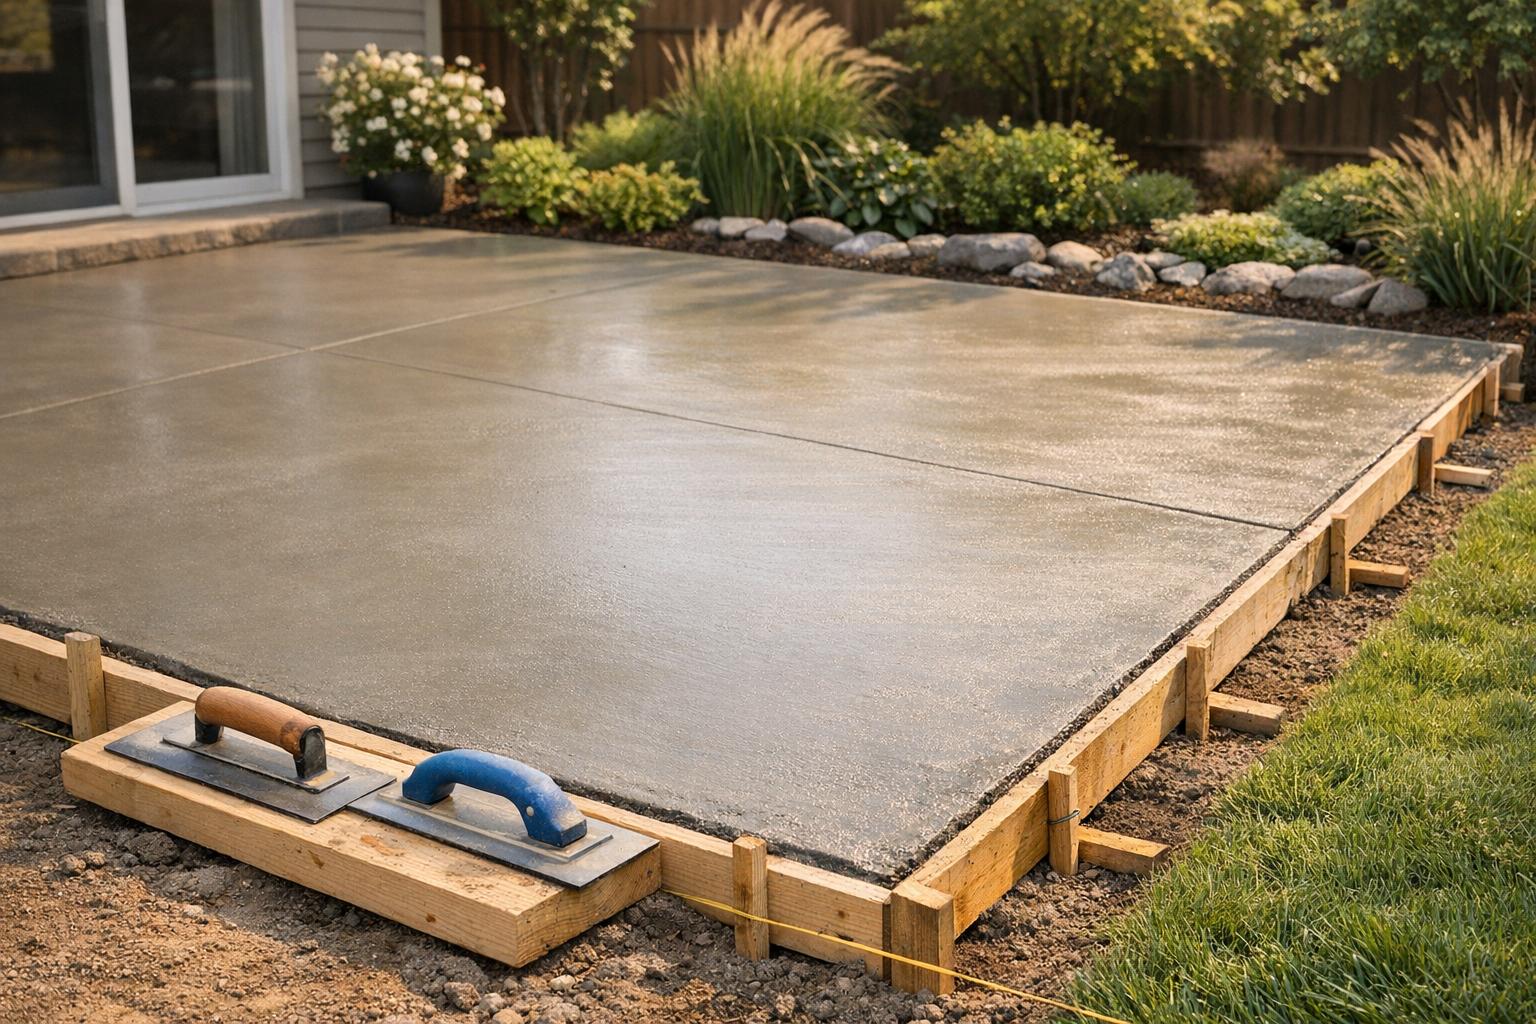
Concrete patios are durable, cost-effective, and versatile, making them an excellent choice for outdoor spaces. In Memphis, where the climate and clay-heavy soil can pose challenges, a well-installed concrete patio offers a long-lasting solution. Here's a quick breakdown of what you need to know:
Whether you’re going DIY or hiring professionals like MidSouth Concrete & Masonry, following these steps ensures a sturdy, attractive patio that lasts decades. Read on for detailed instructions, design tips, and maintenance advice.
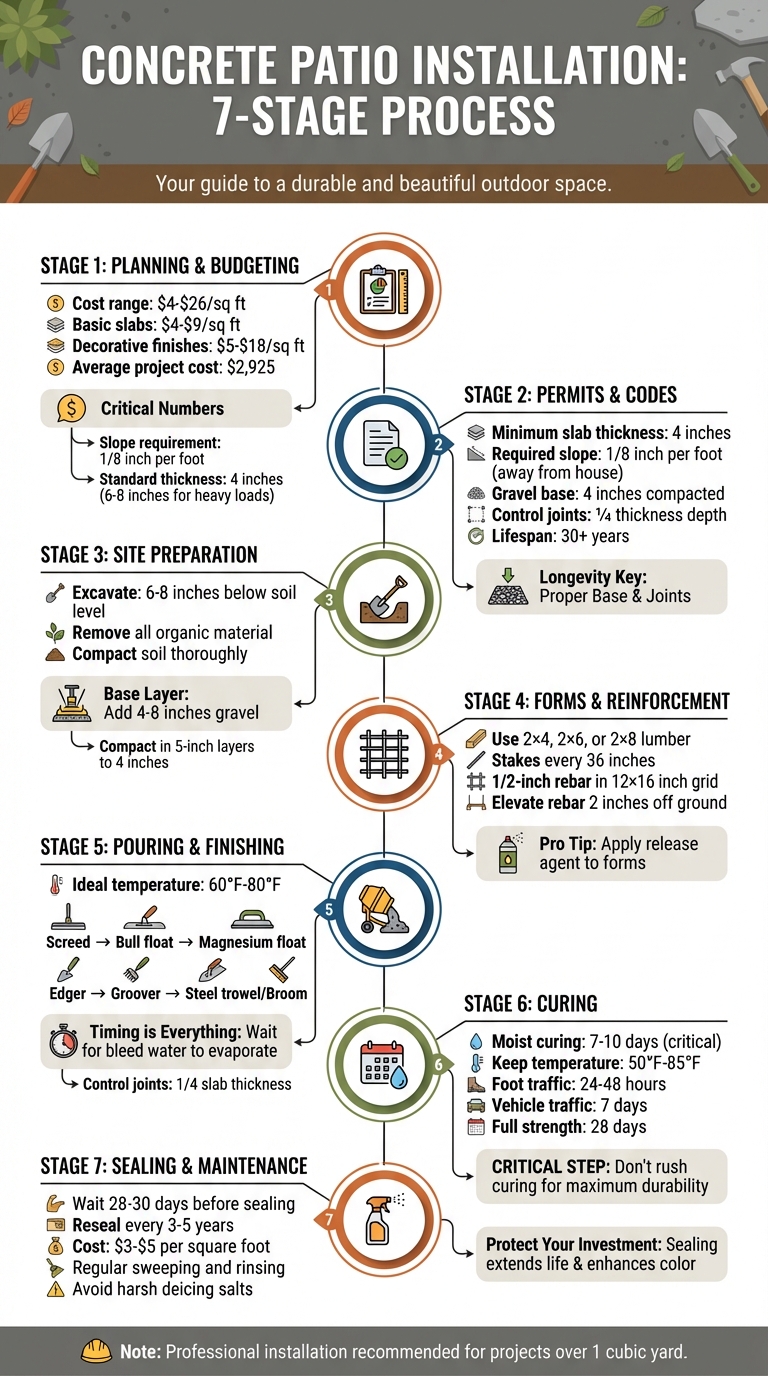
Concrete Patio Installation Process: 7 Steps from Planning to Maintenance
Start by planning your patio around its intended purpose. If you're adding features like a hot tub, outdoor kitchen, or brick barbecue, you'll need a thicker concrete slab - 6 to 8 inches instead of the standard 4 inches - and these heavy additions may even require their own foundations. Be sure to mark out your work area, leaving an 18-inch perimeter for forms and workspace.
Proper drainage is crucial. Your patio should slope away from your house at a rate of 1/8 inch per foot, which prevents water from pooling near your foundation. For example, if your patio is 10 feet long, the far edge should sit 1 1/4 inches lower than the end closest to the house. To make sure your layout is square, use the 3-4-5 triangle method: measure 3 feet along one string and 4 feet along the intersecting string; the diagonal between those points should measure exactly 5 feet.
Think ahead by installing PVC conduit for future lighting needs, and don’t skip the soil test. In areas like Memphis, where clay soil is common, you’ll need to remove the topsoil to ensure stability. Dig a test hole to check soil conditions - remove all organic material to expose firm ground for your gravel base. A well-thought-out plan at this stage will help you set realistic expectations for your project budget.
The cost of a professionally installed concrete patio typically ranges from $1,580 to $4,465, with an average of $2,925 nationwide. While size is the biggest factor in determining cost, your choice of finish also plays a significant role. A basic broom finish costs $6 to $10 per square foot, while stamped or decorative finishes can range from $12 to $18 per square foot.
Labor often makes up 40% to 50% of the total cost. If you’re considering a DIY approach, you could save that portion, but keep in mind you’ll need to rent equipment like plate compactors and bull floats, which can cost $145 to $218. Site preparation can also impact your budget. For example, removing an old patio adds $2 to $6 per square foot, or around $1,300 for demolition. If you need a thicker slab for heavy loads, increasing the thickness from 4 to 6 inches adds about $0.85 per square foot.
Companies like MidSouth Concrete & Masonry offer custom quotes based on your specific needs, site conditions, and design preferences. Getting multiple itemized estimates is a good way to ensure competitive pricing. Scheduling your project during the fall, when demand tends to drop, might also help you secure a better deal. Don’t forget about long-term maintenance costs - plan to reseal your patio every two to three years, which typically costs $3 to $5 per square foot.
Once you’ve evaluated your space and set your budget, the next step is ensuring your project complies with local building codes. In Memphis, small backyard concrete projects often don’t require permits, but there are exceptions. Larger patios, or those that include structures like gazebos or pergolas, may require permits. Always confirm with your local building department and check with your HOA before starting any work.
Even if permits aren’t required, follow standard building practices. For residential patios, the slab should be at least 4 inches thick. Maintain the necessary 1/8-inch-per-foot slope to direct water away from your home and protect your foundation. When pouring concrete next to your house, install an isolation joint using 1/2-inch asphalt-impregnated fiber board to prevent cracking by allowing the structures to move independently.
Prepare a stable base by compacting 4 inches of gravel or crushed stone for proper drainage. For patios larger than 10 feet by 10 feet, cut control joints to a depth of 1/4 the slab’s thickness within 6 to 24 hours of pouring. These joints help manage natural cracking as the concrete cures. Following these guidelines will help ensure your patio lasts for decades - properly installed concrete can hold up for over 30 years.
To get started with site preparation, you'll need a square spade, shovel, tape measure, mason's string, grade stakes, and a level. For building the forms, grab a circular or hand saw for cutting lumber, a power drill with 3-inch deck screws, and a hammer for driving stakes into place.
When it’s time to mix and pour concrete, smaller projects can be handled with a wheelbarrow and shovel, while larger ones might call for a power concrete mixer (rented for about $85 per day). To move wet concrete into place, use a concrete rake or a standard hoe. For finishing work, you'll need a screed board (a straight 2×4), a bull float for smoothing large areas, a wood or magnesium float for detailed smoothing, a steel trowel for the final finish, an edging tool, and a groover for cutting control joints.
Don’t forget safety gear: gloves, safety glasses, sturdy boots, and long sleeves will help protect you during the process. On a tight budget? You can use vegetable or cooking oil as a release agent for the forms. For very small jobs, a plastic mixing tub can take the place of a wheelbarrow.
Having the right tools on hand ensures a smoother process and a better-quality patio.
Start with a strong base by laying a 4- to 5-inch layer of compactible gravel or crushed stone. This layer should be compressed to about 4 inches using a hand tamper or, for larger areas, a vibratory plate compactor. A solid base is especially important in areas with clay-heavy soil, as it helps prevent shifting and cracking.
When it comes to the concrete itself, fiber-reinforced or crack-resistant mixes are a great option as they can eliminate the need for traditional wire mesh. Ben Ashton, CEO of Rocky Mountain Turf, emphasizes the importance of reinforcement:
"Rebar is a must for any poured concrete patio over about 3×3 feet. It gives the pour much more resilience and helps to keep it from cracking".
For patios larger than 3×3 feet, use 1/2-inch steel rebar or welded wire fabric to handle heavy loads and minimize cracking.
Cost-wise, ready-mix concrete delivered by truck is around $116 per cubic yard, while mixing it yourself with 80-pound bags can cost about $200 per cubic yard. If your project requires more than one cubic yard, ready-mix becomes the more economical choice. When pouring next to a house, use 1/2-inch asphalt-impregnated fiberboard for isolation joints, allowing the patio and house foundation to move independently.
For decorative finishes, you can choose from integral colors (mixed into the concrete), color hardeners (applied to the surface), or textured stamps paired with release agents to achieve your desired look. These materials let you personalize the patio while maintaining durability.
Before getting started, reach out to your local utility marking service to locate any underground pipes or wires. Once the utilities are marked, use stakes and mason's string to outline your patio area. To ensure your corners are square, apply the 3-4-5 triangle method.
Expand your outlined area by an extra 18 inches to allow space for forms and workspace. Excavate the site 6 to 8 inches below the current soil level, clearing out all sod, topsoil, rocks, and organic materials. This depth is necessary to accommodate both the gravel base and the concrete slab.
After excavation, compact the soil with a hand tamper or a vibratory plate compactor to prevent settling. Next, lay down a gravel subbase, typically 4 to 8 inches of compactible gravel or crushed stone. For thicker layers, spread the gravel in 5-inch increments, tamping it down to 4 inches each time. Make sure to slope the site away from your house at a rate of 1/8 inch per foot to ensure proper drainage.
With the gravel base compacted and sloped, you’re ready to set up the forms and reinforcement.
Construct your perimeter forms using lumber, such as 2×4, 2×6, or 2×8 boards, depending on your slab’s thickness. A thickness of at least 4 inches is sufficient for standard patios, but opt for 6 to 8 inches if the slab will support heavy structures like hot tubs. Secure the forms with wooden stakes placed every 36 inches along the exterior to prevent bowing during the pour. Start leveling from the highest corner, often near the house, using a laser level or a 48-inch spirit level. Maintain the required slope of 1/8 to 1/4 inch per foot.
Cut the tops of the stakes flush with the forms to avoid interference during screeding. Apply vegetable oil or a commercial release agent to the inside of the forms to make removal easier after the concrete sets. If the slab will be poured against your house foundation, install 1/2-inch asphalt-impregnated fiberboard as an isolation joint to allow for independent movement.
For reinforcement, use 1/2-inch rebar arranged in a 12-inch by 16-inch grid, or opt for steel mesh. Elevate the reinforcement 2 inches off the ground with chairs or bolsters so it sits in the slab’s center. Proper placement is critical - reinforcement lying on the ground won’t provide structural benefits.
Once the forms and reinforcement are secure, you’re ready to move on to the concrete pour.
With the forms and reinforcement in place, begin pouring the concrete in sections, working systematically across the patio. Right after pouring, use a straight 2×4 screed board to level the surface and remove excess material with a sawing motion. Follow up by smoothing the surface with a darby or bull float.
Wait for the bleed water to evaporate completely before moving to the next step. To test readiness, press a gloved thumb into the surface; a 1/4-inch impression signals it’s time for final finishing. Use a magnesium float to smooth out tool marks and compact the surface. Then, run an edger around the perimeter and a groover to create control joints. These joints should be at least one-fourth the slab’s thickness to help manage cracking.
For a non-slip surface, drag a concrete broom across the patio after floating. If a smooth finish is preferred, use a steel trowel when the concrete is firm. Repeat this process two or three times, lifting the leading edge of the trowel slightly more with each pass. The best pouring temperatures range between 60°F and 80°F - avoid pouring if temperatures are expected to drop below 20°F.
| Tool | Purpose | Timing |
|---|---|---|
| Screed (2×4) | Levels concrete with the top of forms | Immediately after pouring |
| Darby / Bull Float | Levels marks and fills voids | Immediately after screeding |
| Magnesium Float | Smooths and compacts the surface | After bleed water disappears |
| Edger | Rounds edges to prevent chipping | After floating |
| Groover | Creates control joints to manage cracks | After edging |
| Steel Trowel | Creates a hard, smooth, dense finish | When surface is firm (1/4" thumbprint) |
| Broom | Creates a non-slip, textured surface | After floating or troweling |
After pouring your concrete, the work isn’t over. Proper curing, sealing, and regular upkeep are key to ensuring your patio lasts for years.
Concrete strengthens through a process called hydration, where water reacts with cement. If the surface dries out too quickly, hydration stops, and the concrete becomes weaker. Tyler Ley, a structural and concrete materials engineering expert, emphasizes:
"Curing is an important step in concrete construction that is often overlooked. If concrete dries out, there's no more hydration, so it doesn't reach its full potential."
The best way to cure concrete is through moist curing. Mist the surface frequently during the first 7–10 days to keep it damp. Alternatively, you can cover the slab with materials like polyethylene sheeting, wet burlap, or curing blankets to lock in moisture. Just remember to lift the covers daily during the first week to re-wet the surface.
Another option is using a curing compound. Jeff Hershberger from Deco-Crete Supply explains:
"To make it simple, it's almost like you're putting a cover over the concrete just to keep everything in there... applying curing compound will keep it from losing too much moisture in the first week or two."
Temperature also plays a big role. Keep the concrete between 50°F and 85°F. If it gets hotter than 90°F, the concrete may set too quickly, while temperatures below 50°F can halt hydration altogether. For colder conditions, insulated curing blankets can help maintain the right temperature.
Here’s a general timeline to guide you:
| Activity | Wait Time |
|---|---|
| Foot Traffic | 24–48 hours |
| Critical Moist Curing | First 7–10 days |
| Vehicle Traffic | 7 days |
| Sealing/Staining | 28–30 days |
| Full Strength Cure | 28 days |
While concrete can handle light foot traffic within 24–48 hours and vehicles after 7 days, it’s best to let it fully cure - about 28 days - before applying any sealers or stains.
Once the concrete has cured for 28 to 30 days, sealing it is the next step. A sealer acts as a protective barrier against water damage, UV rays, stains, and efflorescence. Before sealing, do a water test: pour a small amount of water on the surface. If it beads up, an old sealer is still present and needs to be stripped away with a chemical remover or sandblasting. If the water soaks in, the surface is ready for sealing.
There are several types of sealers to choose from:
For best results, apply sealer during cooler times of the day, like early morning or late evening. This helps prevent rapid evaporation and air bubbles. Use a sprayer for larger areas and a brush for edges, and always apply two thin coats rather than one thick layer.
Maintaining your patio is just as important. Sweep and rinse it regularly, and for stubborn stains like rust or grease, use white vinegar or mild detergent. In winter, avoid harsh deicing salts that can damage the surface. Instead, opt for sand or kitty litter for traction. Address small cracks quickly with patching materials to keep water from seeping in and causing further damage. To keep your patio looking its best, plan to reseal it every five years.
Now that your patio is complete, it’s time to think about ways to make it stand out. Once the concrete has cured and been sealed, you can enhance it with decorative finishes and functional features that bring both style and practicality to your outdoor space. Below, we’ll dive into stamped finishes and additional features to help you create a patio that’s uniquely yours.
Stamped concrete offers the look of natural stone without the hefty price tag. Popular patterns include ashlar slate, wood plank, cobblestone, brick, and natural stone. As Erin Neumann puts it:
"Concrete is sturdy, versatile, and cost-effective, but aesthetically it can feel a bit cold and industrial. That's where stamped concrete comes in."
The cost advantage is clear - stamped concrete is 50%–70% cheaper than natural stone, while still providing a return of 80%–90% of its cost at resale.
When it comes to color, you’ve got options. You can mix integral colors directly into the wet concrete for a uniform look, apply color hardeners for a vibrant and durable surface, or use release agents to create soft secondary tones. To ensure consistent results, it’s a good idea to order 20% more colorant than you think you'll need. For safety, consider mixing non-slip additives like silica into your sealer to reduce slipperiness when the surface is wet.
Want to take your patio to the next level? Consider features like built-in fire pits to enjoy your space even in cooler months. Retaining walls can help manage slopes while doubling as extra seating, and stone veneer adds texture and depth to vertical surfaces.
For a modern touch, think about incorporating living joints - gaps between large concrete pavers filled with grass, moss, or creeping thyme. These not only soften the hard edges of the patio but also improve drainage and create an eye-catching finish. If your yard has uneven terrain, multi-level platforms or terraced designs can help define separate areas for dining and lounging while also managing slopes. Plus, these changes could boost your property value by 8%–10%.
With MidSouth Concrete & Masonry’s expertise, you can rest assured that every upgrade, whether it’s a stamped finish, fire pit, or retaining wall, will combine structural integrity with visual appeal.
The strength and appearance of your patio hinge on careful attention to every phase of the process - from the initial site preparation to the final finishing touches. Every step, from excavation to curing, plays a key role in determining how long your patio will last. As Chris Sullivan from ConcreteNetwork.com aptly puts it:
"If placed, finished and cured properly [concrete] should last a lifetime."
Sticking to the curing and sealing timeline we discussed earlier is essential to achieving the full strength and durability of your patio. While tackling the project yourself might save on labor costs, the complexity of the techniques and the need to meet regulations often call for professional expertise.
With 15 years of experience and over 309 completed installations, MidSouth Concrete & Masonry ensures every project is handled with precision. From thorough site preparation to custom stamped finishes, their team delivers patios that are built to last and designed to impress.
The price of installing a concrete patio can vary widely based on several important factors. One of the biggest influences is the size and shape of the patio. Larger patios or those with irregular shapes require more materials and labor, which naturally drives up the cost. The design complexity is another major consideration. A simple flat slab is usually more budget-friendly, but if you want extras like stamped patterns, decorative finishes, or colored concrete, the price can jump anywhere from about $4 per square foot to as much as $30 per square foot for premium designs.
Other cost factors include the thickness of the concrete - a standard slab is typically 4 inches thick, but thicker slabs will increase the expense. Using reinforcement materials such as rebar or wire mesh for added strength also adds to the cost. Don’t forget about site preparation, which might involve tasks like excavation, grading, or installing proper drainage systems. Additional features like steps, borders, or custom cutouts can further increase the total price.
Lastly, regional labor rates and the specific conditions of your property can play a role in determining the final cost. Whether you’re dealing with challenging terrain or higher local labor costs, it’s essential to factor in all these variables when planning your patio project.
To keep water from pooling on your concrete patio, it's important to ensure the surface has a slight slope that directs water away from your house. A general guideline is to aim for a ½ inch drop for every 9 feet of patio length (about a 0.5% grade). This helps water drain properly without creating an uneven or awkward surface.
Before pouring the concrete, start by preparing the sub-base with compacted gravel - ideally between ¾ inch and 1 inch in size. Shape the gravel to match the intended slope. This layer not only provides a stable foundation but also helps water flow through the joints effectively. If your patio is close to your home, make sure the slope channels water away from the foundation to avoid seepage issues.
For extra peace of mind, you might want to install a drainage system like a French drain or a surface channel. These systems collect and redirect water to a safe discharge area. Just make sure to keep the drains free of debris so water can flow without obstruction. By combining proper grading, a sturdy gravel base, and a reliable drainage system, you can ensure your patio stays dry, durable, and ready to enjoy.
To keep your concrete patio looking great and lasting longer, consistent upkeep is key. Begin by sweeping away any debris and washing the surface with a hose or a gentle pressure washer to clear dirt and spills. For tougher stains, a mild detergent or a concrete-specific cleaner works well to prevent any discoloration.
After cleaning, let the patio dry completely before applying a high-quality penetrating sealer. This step helps protect the surface from moisture, UV rays, and general wear and tear. Plan to reseal the patio every 1–3 years, or more often if it’s in a high-traffic area, to keep it in top shape.
By sticking to a routine of cleaning, tackling stains early, and resealing as needed, you can extend the life of your patio and keep it a beautiful and functional part of your outdoor living space.
© 2026 MidSouth Concrete & Masonry. All rights reserved. Designed by Fullscale.
